This doesn't appear to be much of a task. After all, it's just 4 holes, right!? Well, considering I only had one shot at doing this right, it's a big deal. Proper alignment of the neck is important. I put the neck in place but even with my small shims in the neck pocket, there was some play. Using a straight edge, I was able to line up the fret markers (white dots on the neck) with the centerline of the body then mark and drill those holes!
Monday, January 28, 2013
Saturday, January 26, 2013
WOW! Today I had a full 5 hours straight I could dedicate to working on the guitar. Let me first say that I got a little overwhelmed as I was sanding and shaping the binding edge and realized that about 20 years ago, Semie Moseley was carving out this body by hand himself. No pressure! The binding really turned out quite well. Hard to believe it was my first attempt at binding a guitar. Go big or go home they say! Photos below show the progress of scraping, shaving and sanding down the binding to be flush with the body. I also had to do some sanding on the body to get it flush with the binding in a few spots. Did a little more work to the transition from the german carve to the tip of the horns. I think they look pretty good.
Next step is to do grain filler, and let that dry, sand the entire body again and then we can move on to the next most nerve wracking part... the finish! Going to try my best to duplicate an original sunburst. I've got water based lacquer and some "vintage amber", "orange", and "black" tints for the lacquer to do the busrt with.
Thursday, January 24, 2013
Today I was able to test fit the new binding. I used a heat gun to warm and soften the plastic binding to allow it to bend easier into the tight curves of the guitar body. Once it was all in place i allowed it to cool for a couple of hours then came back and took it back off so that I could glue it. Got it glued in place and re-taped and wrapped with some HUGE rubber bands. When I say huge, I mean they're about 15 inches across BEFORE you stretch them. HA! Anyway, now it's a 2 day wait for the glue to cure fully then I can scrape the plastic binding down where it's larger than the body and do some final sanding of the body in places where it's larger than the binding. A couple of hours worth of final sanding and she'll be ready for grain filler and sealer then on to paint! Going great so far.
Wednesday, January 23, 2013
After much research and talking to several folks directly associated with Mosrite guitars, I have figured out how to do the plastic binding for the body. Today I was able to laminate 2 pieces of white binding together to make a single piece that was actually tall enough and thick enough to fit this unusual binding channel size. Tomorrow will finally start looking like progress as I will be able to shape the binding to fit and possibly even get it glued into place! The photos below are deceiving because I was originally going to do a 3 ply white/black/white binding but the black binding was too thick and made the entire thickness too much. I tried to shave it down to about half thickness, but that didn't work too well. The other choice was go just go all white, so that's what I did.

Sunday, January 20, 2013
It's been a month since I got the Mosrite body and I'm trying to get things together and all in order to really get going on this project. I have been researching the way the binding was done on these models and finally think I have a good grasp on what needs to be done in that department.
Tonight I spent about an hour with various sand paper, sanding pads and a scraper to gently sculpt and shape the tips of the "horns" in regard to the German Carve. Since this body had it's slight slip of the router, it was set aside and never sanded and prepared to finishing. If you compare with the original photos, you'll see that I smoothed the sharp edge on the horns in the carve and i carefully brought down the very tip edge to match the rest of the binding channel so that the binding will fit properly. Doesn't look like a lot done now but it's a nice, solid step to move forward.
This week I will order the binding and necessary adhesives and such to install it. Stay tuned for photos of that project. Looking forward to it!
In other news, I have found a Vibramute tremolo for it. Probably the most difficult piece of this project to find and I have one secured. That's a load off!
Thursday, December 20, 2012
Let the fun begin
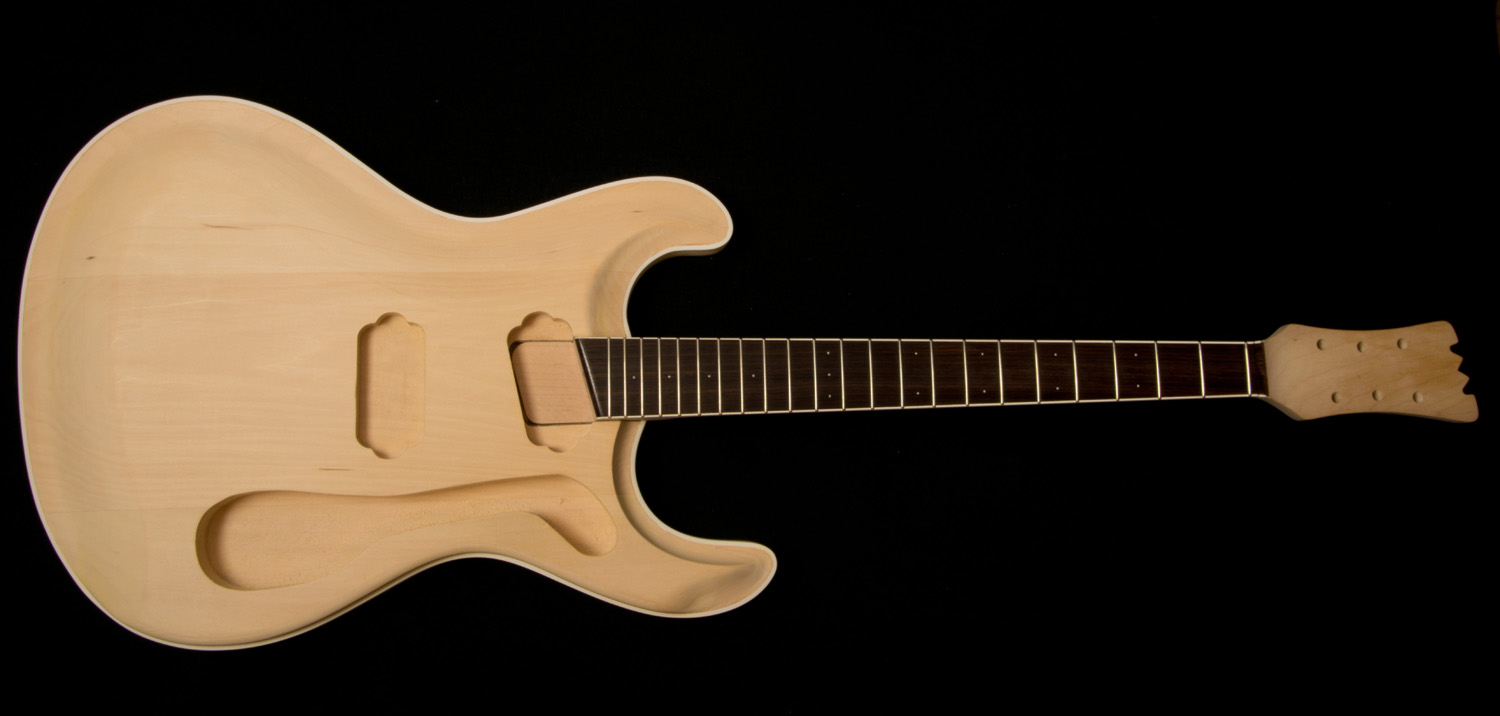
This week I got the body and neck as well as a few miscellaneous parts for this project. A little more detail about this body. After getting the body in, I photographed it and put a pic on Facebook. Dana Moseley, Semie Moseley's daughter, sent me a message letting me know that she recognized this body to be one her dad had made. It has a "flaw" in the carve where the router slipped therefore making this a "factory second". Body was made in or around 1992 at the Booneville, Arkansas factory. This is special to me because my dad grew up there and I grew up visiting grandparents in Booneville. Semie's brother, Andy had kept this body in hopes to finish it one day but saw that wasn't going to happen and I am the lucky recipient of that decision. The body is still quite rough so it will require a lot of sanding before I start doing the planned sunburst finish.
The neck is also a great addition. It is an actual Mosrite neck that is complete with binding, fretboard and frets from the Bakersfield, California factory. I'm not sure of it's exact age but it appears to be fairly recent.
In my research, I also located an original mid-60s tortoise shell pickguard loaded with the pots and switch. My plan is to change that out for a white one.
The heart of Mosrite sound is the pickups. I have a brand new set of Dana-Mo Mosrite pickups that are just begging to go in this project.
I am stoked to have so many special parts for this project and can hardly wait to get started. Glad I'm going to have some down time after the holidays to get rolling on it.
Saturday, December 15, 2012
Welcome to my blog about my second personal guitar project. Many of you follow the progress on "Nikki" my purple ES-335 copy. A few of you even followed posting on Facebook about the Flying V that I built for my Nephew. I also restored a 1968 Kustom K200 in the recent months. Now, I get to start on a project that I have wanted to do for years! A Mosrite Mark I "The Ventures" Model!
Mosrite guitars were made popular by the band The Ventures in the 60s and they have a very distinct look and sound. I have wanted one of them for years. In the early 90's Mosrite moved their factory to the little town of Booneville, Arkansas which is where my dad grew up. I recently acquired an actual new, unfinished "The Ventures" model body made in the Booneville factory shortly before the creator, Semie Moseley passed away. It's even the the more rare version that is cut for binding. The seller of this body turned out to be the brother of Semie. How cool is that? So, now I have this legitimate Mosrite body and was able to locate a vintage, old stock Ventures model neck for this project. 2 of the 3 major components have been located. When they arrive next week, I will shoot some photos of them and share them here. For reference, I am posting this photo to show you what the guitar will look like when finished.
I hope you'll follow my progress over the next several weeks or months as I build my dream guitar!
Subscribe to:
Posts (Atom)